Kitchen Island Electrical and Plumbing Considerations
Adding outlets, a cooktop, or a sink to your island? The electrical and plumbing rough-ins, code basics, and layout planning.

You know how frustrating it is to finish a beautiful kitchen, only to realize you cannot plug in your blender where you actually prep food.
Our remodeling teams see this oversight constantly in older residential designs.
Islands with sinks, cooktops, or even just outlets require utility rough-ins that must be planned early.
Miss that early framing window, and adding a feature later means tearing up your brand-new flooring. We are going to break down the exact kitchen island electrical plumbing requirements you need for a successful project. Let’s look at the three main scenarios and the code updates impacting homeowners right now.
The three utility scenarios
Every utility plan falls into one of three major categories. Our designers always start by determining which functions are non-negotiable for your daily routine.
Outlets only. The 2023 National Electrical Code (NEC) completely changed the rules for adding outlets to kitchen island setups. Side-mounted receptacles are now highly restricted because dangling cords create severe pulling hazards for children. We now focus entirely on integrating safe, flush-mounted options directly into the countertop.
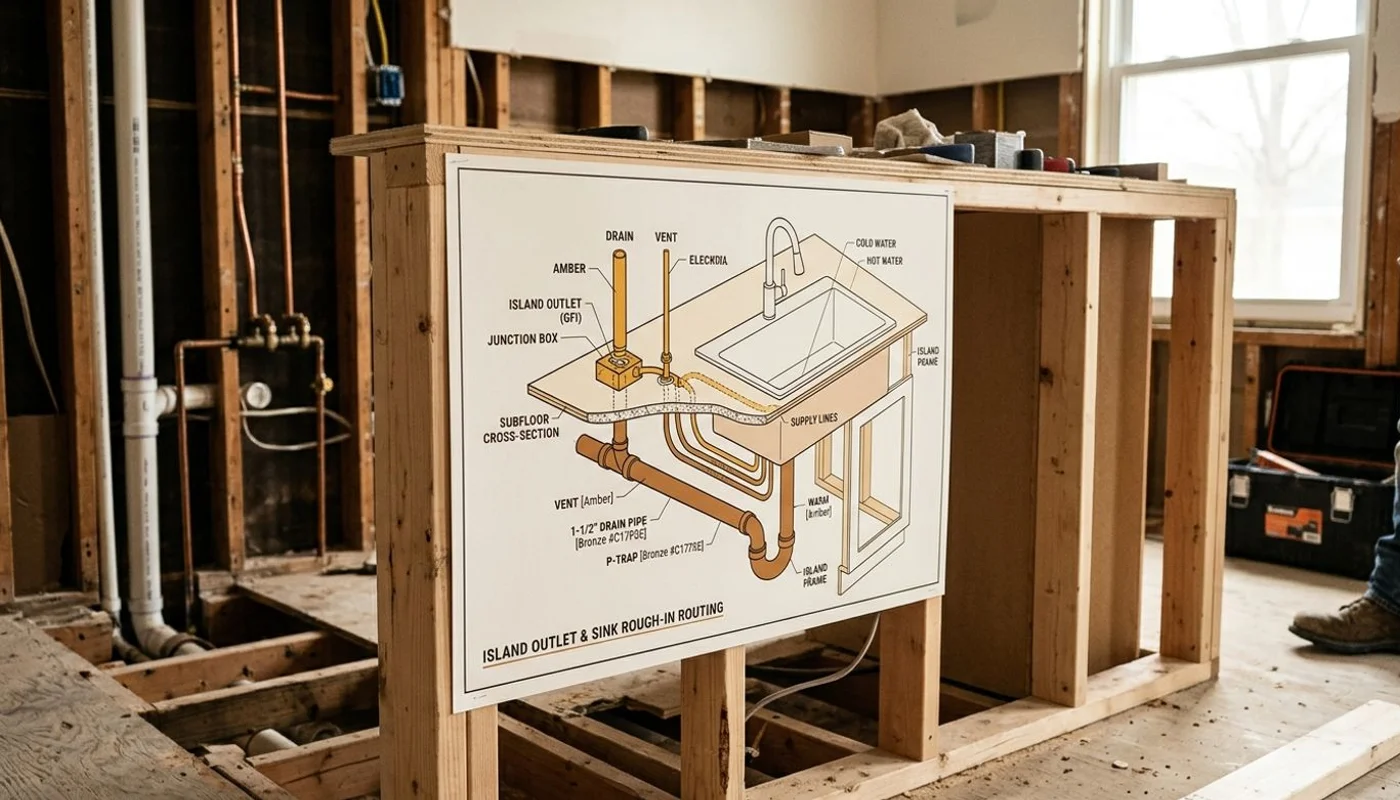
Prep sink. Adding a sink introduces water supply, waste, and vent lines. All three pipes must route directly through the floor joists. Our plumbing partners frequently utilize Air Admittance Valves to simplify this complex venting process.
Cooktop. A cooking station demands either a dedicated 240V electrical circuit or a hard-piped gas line. Ventilation adds another layer of complexity to the layout. We install downdraft systems or ceiling-mounted hoods depending on the specific appliance selected.
Outlets: the baseline
Power is the most common requirement for any functional workspace. Our electricians typically route new island wires from the closest wall straight through the subfloor. If the floor is already finished, this requires opening the wood or fishing wire blindly through joists. Both options are significantly harder than running wire during the open framing stage. We strongly recommend reviewing these standard configurations before closing up your walls.
| Outlet Type | Average Columbus Install Cost | Best Use Case |
|---|---|---|
| Standard Flush-Mount | $250 - $500 | Budget-friendly basic power needs. |
| Premium Pop-Up | $450 - $900 | High-end aesthetics and modern NEC compliance. |
The 2023 update to NEC section 406.5(E) shifted industry standards for island power in a big way. Dangling cords from side-mounted outlets caused too many preventable accidents. Our current project specs prioritize surface-mounted solutions to meet these safety mandates.
Most electrical codes require:
- Code thresholds: Past rules mandated at least one outlet on any island with 12+ square feet of counter.
- GFCI protection: This safety feature is mandatory on any kitchen outlet near a water source.
- Pop-up outlets: Premium units from brands like Docking Drawer stow flush in the counter and rise when needed.
Expect to pay $250 to $500 for a base outlet installation per island. Upgrading to specialized pop-up units adds $200 to $400 to the total material cost. We suggest budgeting for the premium pop-ups if you want a truly clean aesthetic.
Prep sinks: the plumbing considerations
Adding a prep sink transforms a simple counter into a high-performance workstation. Our project managers coordinate these installations closely with licensed tradesmen. Running water to a freestanding cabinet bank requires careful pipe routing. You must account for these four elements:
- Supply lines: Hot and cold water route from the nearest main supply pipe.
- Waste line: The drain must drop through the subfloor to tie into the main waste stack.
- Ventilation: Every fixture needs a dedicated vent to prevent sewer gas siphoning.
- Fixtures: You will need an undermount or drop-in sink, plus a compatible faucet.
Island venting used to require a complex loop that rose above the sink and descended back down. Our current installations frequently rely on Air Admittance Valves (AAVs) instead. These one-way mechanical vents, like the popular Studor Mini-Vent, simplify the process immensely. Ohio plumbing code dictates these AAVs must be installed not less than 4 inches above the horizontal branch drain. We verify this exact clearance during every rough-in inspection.
A standard prep sink plumbing rough-in runs between $1,500 and $3,000. Costs climb much higher if the closest waste stack is far away across the room.
Cooktops: electrical or gas
Placing your primary cooking surface in the center of the room creates a fantastic social dynamic. Our design team loves recommending this layout for clients who entertain frequently. It does require extensive utility planning to execute safely.
Power Supply Choices
Electric units need a dedicated 240V circuit running directly from the main electrical panel. Our installers pull heavy-gauge wire to handle the 40 to 50-amp breakers required by modern induction ranges. Gas cooktops require a dedicated hard pipe routed through the floor from the main meter. The rough-in for either gas or electrical power typically costs $800 to $2,000.
Ventilation Options
Managing smoke and grease in the center of an open concept room is challenging. Our preferred appliance vendors offer several distinct paths to solve this issue. You have three main options:
- Downdraft: This vent rises next to the cooktop and pulls air downward through the floor. Brands like Zephyr make powerful units, though they can sometimes disrupt open gas flames.
- Ceiling-mounted hood: A large canopy hangs from the ceiling. This is highly effective but visually dominant in the space.
- No hood: Code does not strictly require one in all jurisdictions. This path is terrible for anyone doing heavy frying.
Adding a downdraft or ceiling hood adds $1,500 to $4,000 to the total project scope.
Why timing matters
Utility lines must be placed before specific construction milestones close your access. We schedule these specific trades during the initial framing phase for a very good reason. Once walls and floors are sealed, making structural changes becomes incredibly expensive. Current 2026 labor data shows average Columbus plumbers charge between $100 and $150 per hour. Our clients do not want to pay those rates for someone to carefully dismantle finished drywall.
Your rough-ins must be completed before these stages:
- Flooring installation: Opening a finished floor to route pipes ruins the material.
- Drywall installation: Vertical routing from the ceiling requires open framing studs.
- Cabinet placement: Rough-ins must terminate precisely under the planned base cabinet footprint.
Retrofitting an existing space requires integrating the utility work into your initial demolition schedule. Our site supervisors verify every pipe location before a single cabinet box arrives on site.
Code and permit considerations
Municipalities strictly regulate structural electrical and plumbing modifications to protect homeowners. Our administrative staff coordinates directly with Columbus Building and Zoning Services (BZS) to secure all necessary permits. Skipping this vital step can cause major inspection issues when you go to sell the house later. You can read our older Columbus home guide for a detailed breakdown of local permitting nuances.
The National Electrical Code evolves constantly to address new safety data. Our master electricians stay current on every single local amendment to ensure full compliance. Recent compliance highlights include:
- GFCI protection is now mandatory on all kitchen receptacles, not just those positioned near water.
- Countertop outlets require dedicated 20-amp circuits to handle modern appliances.
- Sink venting must meet specific local height and distance constraints.
Always verify these rules with a licensed professional before starting any weekend DIY work.
Getting the utilities right
The layout for a fixed island must be locked in before flooring or cabinets are ordered. Our kitchen island design service plans this exact utility routing as a core part of the drafting phase. Moving a pipe two inches to the left is easy on a digital blueprint. Doing it after the foundation or subfloor is finished is a logistical nightmare. We suggest checking out the island cost guide to see exactly how these rough-in fees impact your total budget.
Are you ready to plan a space with the professional utility features you deserve? Book a free consultation today.
Frequently Asked Questions
Do kitchen islands need outlets? +
Most modern electrical codes require at least one outlet on any island above a certain size (typically 12 sq ft or more of counter). We rough in outlets to code on every fixed island install.
Can I add a sink to my island? +
Yes, with a plumbing rough-in planned before the island is built. The waste line has to be routed through the subfloor with proper venting. This decision has to be locked before the floor closes up.
Why does the island layout need to be finalized early? +
Electrical and plumbing routing under the floor must be set before finishes go in. Once flooring is down and the island base is installed, changing utility locations means tearing up floors — expensive and disruptive.